IF you think I'm going to post my secret Chili Recipe...
...YOUR NUTS!!!
Talk to me on my deathbed.

GlennDL

Sunday, April 12, 2020

Soup From Scratch

  • Ingredients
  • Making Soup Stock
  • Sauté
  • Wine for cooking?
************************************************


Ingredients
1) Choose a type of fat
    graphic (17)
  • start with some type of healthy fat, like butter or olive oil.  This is to sauté (see sauté below) any root vegetables or other initial flavors.  
  • use what you have on hand that will mesh well with your flavors.  (olive oil if you wanted an “Italian” soup with a tomato base, and butter if you're making a cream soup. 
  • otherwise, it’s a toss-up.)
2) Choose your base 
  • see Making Soup Stock below
3) Choose your meat
If you want meat, that is.  
  • Choose whatever you like.  You’ll probably want this to match your base (beef with fish stock might not be such a great combination), but use what you have.  
  • you can use chicken stock in place of beef stock with great results, especially if you also added tomato.
4) Choose your veggies
  • Onion is a pretty standard because it imparts so much flavor.  
  • Garlic, carrots, and celery are all fairly common too — though not always used.  
  • There are also beans, potatoes, spinach, kale, corn, and so on.  Use whatever you have, and whatever you like!
5) Choose your spices
Sea salt and black pepper are your two most basic spices, so you will want to include them (well…at least the salt). Here are a few more popular flavor combinations.
• Celery seed, marjoram, thyme, parsley, and sage go well with chicken.
• Marjoram, rosemary, and thyme go well with beef.
• Basil, oregano or fennel can be a nice addition to tomato-based soups.
• Chilis need chili powder and perhaps cumin.
• Cream soups might benefit from a dash of parsley or thyme.
But, that’s just “common” ones – feel free to dream up any combination you like.  Remember to taste and adjust as you go, though.
Once you’ve decided on what ingredients to use, making soup is very simple:
1. Heat a large soup pot over medium heat
2. Sauté your aromatic vegetables (onion, garlic, celery, carrot) in your fat
3. Cook your meat if necessary (for example, stew beef)
4. Add your base (except milk or cream), veggies, meat, and spices
                              (see Making Soup Stock below).

5. Taste and adjust
6. Allow simmering for an hour or two
7. Taste and adjust again

Add any cream or milk just before serving and heat through
************************************************

Making Soup Stock:
If you prefer making your stock/base instead of using store-bought broths etc.
What is stock in making soup?
Stock, sometimes called bone broth, is a savory cooking liquid that forms the basis of many dishes, particularly soups, stews, and sauces. 

Making stock involves simmering animal bones or meat, seafood, or vegetables in water or wine, often for an extended period of time.
  1. Gather some vegetables and herbs. Onions, carrots, and celery give the stock a great base flavor, and you can round these out with any of the other vegetables listed above. ...
  2. Coarsely chop all the vegetables. ...
  3. Cover with water and bring to a simmer. ...
  4. Simmer for about 1 hour. ...Strain and store.
You can dictate the character of your soup by how you decide to start cooking it.
1. Bold and sturdy flavors come from starting the soup by fast-browning the onions and some of the vegetables in good-tasting oil or butter over medium-high heat.
2. Mellow flavors are achieved with slow-stewing onions and key ingredients, like herbs, in a little fat in a covered pot over low heat.
3. Clear, true flavors come from simmering everything in liquid with no pre-sautés.


Thickening with Flavor
Cream soups were traditionally thickened with flour as well as cream.

For bean soups, crush a cup of the beans and return them to the pot.
With vegetable soups, stews, and meat braises like pot roast, puree a few of the vegetables that have been cooked in the pan liquid, then stir them back into the pot.


In many cream soups you can skip the cream and instead use a good-tasting potato for more substance.
**************************************
Sauté:
In a large saute pan over medium-high heat, add the olive oil and heat. Add the garlic and sauté, stirring, for 1 minute. Add all of the vegetables and cook until just starting to wilt, about 2 minutes.

What do you sauté first?
Tip: To avoid overcooking and undercooking different vegetables, add those with longer cooking times in first, and put others in later. Veggies with longer cooking times: carrots, onions, and potatoes. Medium: broccoli and bell peppers. Short: mushrooms, tomatoes, and leafy greens.

(Begin by saute-ing garlic/onion/bit of chili - only add salt and pepper later if required.)
**************************************
Wine for cooking?
Note: Wine is a powerful flavor booster because alcohol opens up flavors that neither fats nor water release. Also, red wine is high in umami, a chemical component of some foods which heightens flavors. So be generous with the wine. Use white wine in pale soups, red in dark ones, and anticipate 1/2 cup for every 8 cups of liquid. Contrary to rumor, all the alcohol in wine and other spirits does not cook off.
The most important thing to know is that the wine should taste good on its own. A poor-quality wine can ruin a great dish.
Luckily, there are great-tasting white wines for very affordable prices. So, eliminate anything labeled as “cooking wine” since it probably earned its title by being unfit to drink.

As a general rule, dry white wines (wines that don’t contain sweetness) are preferred for cooking lighter dishes such as chicken, pork, veal, soup, seafood, shellfish, and vegetables. Below are examples of these dishes paired with widely available styles of wine.

Try Herbal Dry White Wines
• Sauvignon Blanc
• Grüner Veltliner
• Verdejo
Sauvignon Blanc is a classic light wine with fruity, herbal and floral flavors that add an amazing dimension when cooking vegetables. It’s among the easiest wines to cook with, just splash the wine in the sauté pan to deglaze. (dilute meat sediments in (a pan) in order to make a gravy or sauce, typically using wine.

The longer you cook the wine, the less alcohol will be in the dish. It can take as long as 2.5 hours of simmering to completely remove the alcohol.

Open, refrigerated white wine is drinkable for up to a week and suitable for cooking for two weeks.

**************************************

sources:

  • google search
  • https://www.splendidtable.org/recipes/basic-soup-improvisation 
  • https://winefolly.com/wine-pairing/dry-white-wine-for-cooking/ 
  •  https://simplebites.net/how-to-make-soup-from-scratch/ 

Remember these are my notes tailored from the above sources. Abbreviated for what works for me. see the original articles in full to tailor to your choices.    GlennDL

Tuesday, March 24, 2020

Simple Pulled Pork


  1. 2lb pork tenderloin, butt or shoulder.
  2. bottle of barbecue sauce (18oz.)
  3. can of root beer (12oz.)
In a slow cooker:
  • place pork in slow cooker, pour root beer over pork and cook on low for 6 hours, covered, until pork shreds easily with a fork
  • remove pork to cutting board
  • drain and discard the root beer
  • Shred pork
  • return to cooker
  • poor BBQ sauce over pork and stir


Sunday, March 8, 2020

Glenn's Gumbalaya

Gumbalaya? Because it too hard to choose between Gumbo and Jambalaya.

Friday, December 13, 2019

Tasty Water: Hydrate

I've always had trouble drinking water. I could never stand the taste... except when I was extremely heated from the weather or working out and even then it glass of waterwas not good, just necessary. Thus I've always had a problem with dehydration.
Over the last year, I have drunk nothing but bottled water (following the minimum regime listed in the "Hydrate" post below) but even bottled water was not a remedy.
While looking for a probiotic to replace yogurt (settled on Kombucha) I started re-examining my attempts at increasing my water intake after I stumbled on an article about PH water that said water with a higher than 7 ph taste better. I tried Glaceau Smart Water (ph7.6) and sure enough, it was easier to drink. Over the last week, that's all I've drunk and it is still easy to down it. Going to try other brands with even higher PH levels (up to 10)
  • Alkalife TEN=             10
  • Essentia                     9.4
  • Evamor                       8.8
  • Icelandic                     8.4
  • Eternal                        8.1
  • Real Water                 8.0
  • Evian                          7.9*
  • Penta                          7.8
  • Dear Park                   7.8
  • Glaceau Smart Water 7.6
  • Voss                            7.6
  • Volvic                          7.5
  • Fiji                               7.3
  • Nestle Pure Life          7.3
  • Poland Spring             7.2

I composed this list because most waters don't put their PH level on their bottles.
Some will say their PH balanced, but it is unclear if that means they strive for a certain PH level or strive for an above 'neutral' PH level. So I don't think you can trust the 'balanced' label.
Most waters appear to be neutral or below. Below neutral is considered 'acidic' and above is considered 'alkaline'. Neutral is PH 7.0, so look for PH above that, the higher the better.
There are other advantages to above PH 7 waters besides improved taste. GOOGLE it.
*note: Always check the label. Looked at an Evian bottle and the ones that showed a PH level showed a level below that show in the above chart. Its not uncommon for a brand to have a mixture of waters in their line.
Copyright © 1992-2019 Glenn D. Littrell www.glennlittrell.com

Tuesday, December 10, 2019

Smoothies:


Fruit Smoothie:

  • Base - Dairy (milk, soy milk or almond milk) & yogurt (with fruit if no other taste used)
  • Taste - fruit (frozen or fresh (oranges, strawberry, mango or banana)
  • OR flavored protein powder (also as a supplement)
  • OR flavored coffee creamer
  • OR syrup
  • OR crunchy protein bar (also as a supplement)
  • OR Boost, Ensure (also as a supplement)
  • OR a supplement - turmeric (anti-inflammatory) or Cinnamon, or powdered dietary, vitamin, or mineral supplements

Vegetable Smoothie:
  • Base - V8 juice
  • Flavor - hot sauce, Worcestershire sauce (gives it a non-acholic taste)
  • Supplement - frozen or fresh broccoli (I use frozen because it doubles as ice cubes) or cider vinegar, or turmeric (anti-inflammatory), or powdered dietary, vitamin, or mineral supplements


Proportions are a matter of the taste AND consistency you like.
Throw it all in a blender.

Sunday, April 29, 2018

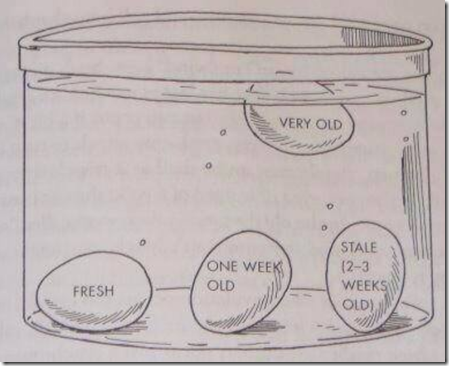
Ignore the ‘fresh’ date? How2 determine the freshness of an egg.

imageOld eggs float in fresh cold water because of a large air cell that forms as the egg cools after being laid. As the egg ages, air enters the egg and the air cell becomes larger and this acts as a buoyancy aid. Generally, fresh eggs will lie on the bottom of the bowl of water.

image

How does a baby bird breathe inside the egg?

The two membranes pull apart a little and create a small pocket or sack of air. As the developing bird grows, it breathes in oxygen from the air sack and exhales carbon dioxide. Several thousand microscopic pores all over the surface of the egg allow the CO2 to escape and fresh air to get in.

The oldest and easiest way to tell if an egg is fertilized is called candling the egg. It is literally holding the egg up to a lit candle {not to warm it, but in order to see inside of the egg}.

https://mariherigstad.wordpress.com/2016/01/26/how-do-eggs-breathe/

Wednesday, January 17, 2018

Glenn's Stir Fry:

INGREDIENTS:

Step1:

EVOO, minced or pressed garlic, cumin powder, pepper, 1/2 sliced onions, sausage (half a rope 7.5oz)

INSTRUCTIONS:

Step 1)

In a 10 inch skillet heat oil, add cumin, garlic, when oil is hot add sliced sausage. Brown sausage, season with Cumin and pepper, add onions and sautéed. Remove mix.

Step 2:

12oz package "Kroger's Stir-Fry Starters: Vegetables with Noodles". .75oz "SUN-BIRD Stir Fry Seasoning Mix", 2tbls Soy Sauce, 1/3rd cup of water.

Step 2)

Add more EVOO if necessary, add vegetables, cover with Onions & sausage mix, combine Stir-Fry seasoning mix, soy sauce, and water. Blend and pour over everything. Continue to cook covered, stirring often. Broth will start to thicken… cook to preferred taste.

What I also do is I'll preheat the oil that I put in the skillet and I'll add powder cumin and minced or pressed garlic to the oil. I also put black pepper in sometimes but I always put black pepper and more cumin on the meat after I add it to the oil

1516155788627The vegetable that I use are from Kroger's and there the 12 oz package of frozen vegetables. I use several varieties: the stir fry starters and other frozen vegetable mixes. (these package are cheap at about $1.39 at Kroger's, but if you time it right you can get them at the 10 for $10 mix and match sales.)  *

1516155759068Once I've dumped the frozen vegetables into the pan I'll cover them and cook to the point where the vegetables aren't frozen then I'll add the stir-fry mixture.

The seasoning mix is only about $0.99 packet, I've tried to Kroger brand and it works just as well.

I generally follow the instructions on the packet except that I don't add the sugar.


1516158893273Like with the vegetables I mix up my choice of sausage, usually sticking to the smoked sausage ropes and varying between turkey, Kielbasa, beef, etc. The rope sausage usually runs between $2.79 and $2.99, but they'll go on sale about once a week at 2 for $5.00.

Average cost: Sausage (1/2 rope) $1.25 Vegetables $1.00 Seasoning mix $1.00 onion (1/2) $1.00 = $4.25

*On all frozen vegetables I pick all the mushrooms out, I don't think the high quality mushrooms go to the restaurants and seldom make into packaged products.

Tuesday, November 28, 2017

Apples:

Apples ripen quickly at room temperature. If you plan to eat them within a day or two, they'll be fine on the counter. Otherwise, refrigerate them in a perforated plastic bag. If possible, store them in the back of the refrigerator.

Keep them cool. The ideal storage temperature is 30 to 35 degrees F. with 90 to 95 percent relative humidity. If you don't have a lot of apples, the refrigerator is a good option. Place them in the crisper drawer in a plastic bag with holes in it or cover the apples with a damp paper towel. note: note: I have read where it says you shouldn’t wash produce before putting it in the refridgerator because it encourages mold or mildew, but I can’t remember the source.

  1. Keep them whole. As apple slicessoon as you cut into an apple, the flesh starts to slowly turn brown from the oxygen in the air. ...
  2. Keep them in the crisper drawer of the refrigerator. Apples continue to ripen even after they are picked. ...
  3. Keep them separate from other fruits and vegetables.

from food scientist Susan Brewer: “The longevity of an apple is determined in part by its water and sugar content.  Hard winter apples (Granny Smith), which have a lower water content, last longer than summer apples.

see also: Snack Apples

image

Wednesday, November 22, 2017

HOW2 Make An Omelet (or if all fails, HOW2 make scrambeled eggs):

image

Detail:

  • 2 eggs
  • butter or EVOO (olive oil)
  • 2 tablespoons whole milk or water (optional)
  • Seasoning: Worcestershire sauce, salt and ground pepper, to taste. (optional 1 dash seasoning (Cajun or Creole)
  • sautéed onions
  • cheese

Always make an omelet in a nonstick pan. 2-egg omelet =8-inch omelet pan, 3-egg omelet=10-inch pan. But any nonstick sauté pan will do as long as it's round with sloped sides and between 6 inches and 10 inches in diameter.

  1. Add the milk & seasoning to the eggs and whisk like crazy or throw in a blender. Whatever device you use, you're trying to beat as much air as possible into the eggs.
  2. When the butter in the pan is hot enough to make a drop of water hiss, pour in the eggs. Don't stir! Let the eggs cook for up to a minute or until the bottom starts to set.
  3. With a heat-resistant rubber spatula, gently push one edge of the egg into the center of the pan, while tilting the pan to allow the still liquid egg to flow in underneath. Repeat with the other edges, until there's no liquid left.
  4. Your eggs should now resemble a bright yellow pancake, which should easily slide around on the nonstick surface. If it sticks at all, loosen it with your spatula.
  5. Gently flip the egg pancake over, using your spatula to ease it over if necessary. Cook for another few seconds, or until there is no uncooked egg left.
  6. If you're adding any other ingredients, now's the time to do it. (See below.) Spoon your filling across the center of the egg in straight line.
  7. Lift one edge of the egg and fold it across and over, so that the edges line up. Cook for another minute or so, but don't overcook or allow the egg to turn brown. If necessary, you can flip the entire omelet over to cook the top for 30 seconds or so. Just don't let it get brown. The omelet will continue to cook after you remove it from the heat.

Possible fillings: mushrooms, diced onions, peppers, ham, or crumbled bacon and your imagination..

Thursday, April 13, 2017

FAKE OLIVE OIL COMPANIES REVEALED – STOP BUYING THESE BRANDS NOW!

imageAlmost 70% of Olive oils found in the local stores in the US are fake! This is a result of the cheaper, nastier oils from which they are produced. Seven of the greatest olive oil manufacturers produce olive oils from cheaper, inferior oils, such as canola or sunflower oil.

This is in order to reduce the production cost and come to a huge profit.

In 2008, the Italian police take part in a crackdown called Operation Golden Oil. Nearly 85 oil farmers were caught who added certain percentages of chlorophyl to canola and sunflower oil and selling such products as virgin olive oil. Also, this oil was colored, perfumed, mixed and flavored in order to look like a virgin olive oil.

For this reason, the Australian government prompted to investigate their olive oil market. After certain testing of the virgin olive oils it turned out that none of them deserved the 2012 certification of pure olive oil.

Also, the University of California has conducted a study on 124 imported virgin olive oil brands and the result was that more than 70% were fake.

The following brands have failed the test:

  • Bertolli
  • Pompeian
  • Star
  • Colavita
  • Antica Badia
  • Sasso
  • Carapelli
  • Primadona
  • Mazola
  • Safeway
  • Felippo Berio
  • Carapelli
  • Mezzetta
  • Whole Foods
  • Coricelli

These brands can be trusted because they passed the test:

  • Ottavio
  • Corto Olive
  • Bariani Olive Oil
  • Omaggio
  • Lucero
  • Kirkland Organic
  • Lucini
  • California Olive Ranch
  • McEvoy Ranch Organic
  • Olea Estates
  • Cobram Estate

You can make certain tests at your home in order to find out whether the olive oil is fake or not. Place a bottle of olive oil in your fridge for half an hour and see whether the oil is starting to solidify. If solidified, the oil contains a great amount of monounsaturated fat, which indicate it is of good quality. If it does not, the olive oil is fake. Although not the perfect test, it is a good indicator whether the olive oil is of good quality. When you are not sure about certain brands, look for those which are labeled as California Olive Oil Council Certified Extra Virgin and Australian Extra Virgin Certified.

It is high time we oppose and stop supporting such corrupt industry of GMO’s, chemical substances and unhealthy ingredients. Such an action would stimulate an honest trade, an honest industry where people get paid for the honest products they pay for.

from: http://topslowcookers.com/2017/04/11/fake-olive-oil-companies-revealed-stop-buying-these-brands-now/         (warning, their page takes forever to load)

Monday, January 2, 2017

Tuesday, December 27, 2016

Making a roux:

imageAfter 2 failures, a ruined spatula, and a smoke detector activation I found this video and got it right:

Hope this helps.

Wednesday, November 23, 2016

Maximum Refrigiration Time:

Saturday, April 23, 2016

Kracker Kandy Mix

Here’s what you need:
1 tube of saltines (~ 40 crackers +)
1 cup (2 sticks) butter (either salted or unsalted; do not use margarine)
1 cup + 2 Tbsp. firmly packed brown sugar (I prefer light)
1 bag chocolate chips (I like semi-sweet)
1/2 to 3/4 cup toasted chopped pecans (or toasted chopped almonds)

Instructions:
Preheat oven to 350 degrees Line cookie sheet with foil & spray with non-stick cooking spray. Line crackers end to end on sheet, breaking crackers to fit the end if necessary. In a saucepan, melt butter on low heat. Once melted, add brown sugar and turn heat to medium. Continue stirring until boiling – then boil for 3 minutes (set timer). Pour over crackers, spread evenly working quickly. Put sheet into oven – bake for 5 minutes. Remove – pour chocolate chips over top – place a sheet of foil over and let melt for ~3 minutes. Spread melted chocolate over the top evenly. Add nuts to top – replace foil and refrigerate until set
(can be frozen)

-Lori Nolan

Tuesday, April 19, 2016

Cleaning & Maintaining A Cast Iron Grill – tips

Beggining & end of season

Exterior and interior – Tubcooking bear

  • Window Cleaner
  • Gloves
  • Lint free rags
  • Warm soapy water (Dawn)
  • sponge
  • scraper

Racks & Grill plates:

Method 1 – Baking Soda

  • Fill a large bucket (one big enough to accommodate the grates) with hot water and one quarter cup of the dish soap you use to wash dishes in the sink.
  • Stir in a quarter cup of baking soda until you have a good lather in your bucket.
  • Drop the grates in the bucket and let them soak for an hour.
  • Scrub them with a steel wool pad to remove any remaining debris. or proceed…
  • …you can attempt to clean rust off cast iron grills and other metal surfaces using a thick paste make from baking soda and water. Apply the paste to the rust build-up and allow it to sit for a few hours. Then, scrub away the paste using an abrasive surface, repeating as necessary.

Method 2 – Vinegar

Learning how to clean rusty grill grates with a non-toxic substance is important since you will be cooking on them. Vinegar and salt are both edible substances, but will also remove rust.

Rub the rusty surface with plain white vinegar at full strength and allow it to sit for a few minutes. Once the vinegar starts to dissolve the rust, use your wire brush or steel wool to begin cleaning the affected area. Repeat until the rust is gone, or proceed…
  • Mix two cups vinegar and one-cup salt in a bowl. Place your rusty grates in a large heavy-duty garbage sack. Pour the vinegar and salt into the bag and tie it shut.
  • Lay the bag flat on the ground and let the grill soak overnight. After soaking, wipe the rust off with an old rag. The salt should act as a mild abrasive to scrape off the rust.
There are plenty of commercial rust removers. These generally work well, but may contain toxic chemicals you may not want near your food. Purchase a commercial rust remover specifically made for cleaning rusty grill grates in the barbecue section of your home repair warehouse store.

A mild enzymatic cleaner like Dawn Grill Cleaner is probably safer than a chemical cleaner whose residue could be noxious.

Method 3 – Salt Paste

  • If you need something more abrasive than baking soda or vinegar to remove the rust from your cast iron grill, make a thick paste of kosher salt and water. Apply it to the rusty area, then use steel wool or a wire brush to scrub away the rust. Repeat as necessary. For particularly stubborn rust, you may need to begin your cleaning efforts with a salt paste, but may find that you can switch to the less abrasive baking soda paste once the first few layers of rust have been removed.

Alternative Method:

  • Another way is to put your grates in a self-cleaning oven and run them through the cleaning process. Be cautious with this one since it could end up discoloring your grates. If you don't mind what color they are, it is a simple method to use.

Seasoning:

  • Grill grates need to be seasoned like an iron skillet. The more you cook on them the less meat will stick, due to the fat in the meat lubricating the grate. The fat also prevents rust from forming. After each use, coat the grate with vegetable oil (Peanut Oil is supposed to withstand higher temeratures) to lubricate and season the grate. Do not use an aerosol can of vegetable oil. Aerosol cans explode near flames.

Brushing Method: After each use

  • Stand in front of your grill and place the head of the grill brush on top of it.
  • Starting at the top of the left side, move the brush in the direction of the wires on the grates.
  • Continue brushing in this manner until you have cleaned the entire grill.
  • Shake the brush over a garbage bag to remove any debris from it.
  • Debris that fell into the grill should burn off the next time you use it.

Storing:

  • Heavily coat w/peanut oil & bag it.

grilling
We do not recommend the use of porcelain cooler & griller combo grills.

Friday, March 25, 2016

Summer Cooking Tips From 'America's Test Kitchen’

Some summer thoughts for a winter day.Bridget Lancaster and Jack Bishop prepare a traditional summer barbecue, as imagined by WHYY's artist-in-residence, Tony Auth.
Have any grilling tips that you want to share? I’m starting a new category for grilling recipes and tips. Any ideas and suggestions will be credited. Want to share your tip, website or book suggestion?
Click on “read/leave comments” link in the gray box below or email me at the email address below.


Tony Auth

Bridget Lancaster and Jack Bishop prepare a traditional summer barbecue, as imagined by WHYY's artist-in-residence, Tony Auth.

Tuesday, July 28, 2015

Top Immunity-Boosting Super Foods:

The Essential Nutrition Guide for Boosting Your Body's Defenses to Live Longer, Stronger, and Disease Free
by Joel Fuhrman, M.D.
In The New York Times best seller, Super Immunity, Dr. Fuhrman covers brand new topics: how proper nutrition can fend off cold, flu and other infections; the role of the immune system in cancer development; and eating to prevent cancer. Also unique to Super Immunity is the in-depth discussion of the striking scientific findings about G-BOMBS (Greens, Beans, Onions, Mushrooms, Berries and Seeds), Dr. Fuhrman’s anti-cancer super foods. Now is the time for America to win the war on cancer and for you to immediately protect yourself and your loved ones.

topsuperfoods

Wednesday, July 22, 2015

Spice Chart:

Upset stomach, bloated, congested, run down, nauseous?

Spices

AMERICAN SPICE TRADE ASSOCIATION, INC.
SPICE LIST:

ASTA recommends that for the purpose of complying with FDA food labeling regulations (21 CFR Sec. 101.22), the following items may be declared in a product’s ingredient statement either individually by its common or usual name or included under the term “spice” as permitted in 21 CFR Sec. 101.22(h). The spices on this list, and their derivatives (e.g. extracts and oleoresins), are considered by FDA to be generally recognized
   see list

Sunday, May 17, 2015

Popcorn In A Pot. When I Saw What She Did, I'll Never Use The Microwave Again!

I’m going to try this as soon as my supply of microwave popcorn is gone:
“The smell of freshly popped popcorn is one of my favorite things. But once you smell what stove-top popped corn smells like, you'll never want to microwave your popcorn again. And the taste?? WOW! A MILLION times better than the microwaved stuff. This will quickly become your new favorite treat. And the fact that it only takes a minute to do is really enticing to me. Why would you ever settle for the bagged microwave stuff, when this is so easy?”

Monday, May 11, 2015

Health benefits of ACV and honey mix:

10 Amazing Health Benefits of Apple Cider Vinegar and Honey

anim (3)Raw honey and ACV are both praised for their abilities to ward off infections and treat different conditions that have an impact on your quality of life. If you consume them together, you’re likely to experience the following benefits:

  1. Better joint health and joint pain alleviation (good for arthritic pain)
  2. Acid reflux and heartburn relief
  3. Improved digestive health, including help with constipation
  4. Weight loss
  5. Reduced cholesterol levels and lower blood pressure
  6. Sore throat relief
  7. More energy
  8. Youthful appearance and better condition of the skin
  9. Remedy for bad breath
  10. Reducing inflammation

MORE